Part of learning how to make handmade cards is learning how to cut your card stock. You need to know how to cut your card bases, as well as what sizes to use for the layers. I have some simple cutting tips to share with you so that you can learn how to cut card stock the easy way and be successful with your layering.
We are focusing on what I call “regular-sized cards” (also known as A-2 cards) that are made from a half sheet of 8 1/2″ x 11″ card stock for the card base. You certainly can make other-sized cards as well, but this is the most common so once you learn how to cut card stock for this sized card you can venture out and make other sizes too.
Once you have made your card base, you will have a 5 1/2″ x 4 1/4″ area to design the front of your card on. That is when the fun and the magic begins. You will need to decide if you are going to add additional layers, and if so, what size to make them. There really is no right or wrong size, it is what is appealing to you and what you like.
But I know deciding can be hard, so I have some standard sizes that I use all the time and it will make it easy for you to cut your card stock and make layers. I even share in the video how I made templates to help me.
video tutorial – learn how to cut card stock
In the video, I show you how to score your card stock, cut it for 2 card bases, and how to determine what size layers to cut for your card front. Keep scrolling down for all the template measurements so that you can make this handy dandy cutting tool.
Remember, there is no right or wrong way to what size layers you use on your card. I am just sharing my “general rule of thumb” that I use. This is especially helpful for beginning card makers. The more you learn and venture out to designing your own cards, the more you will try and play around with different layering sizes.
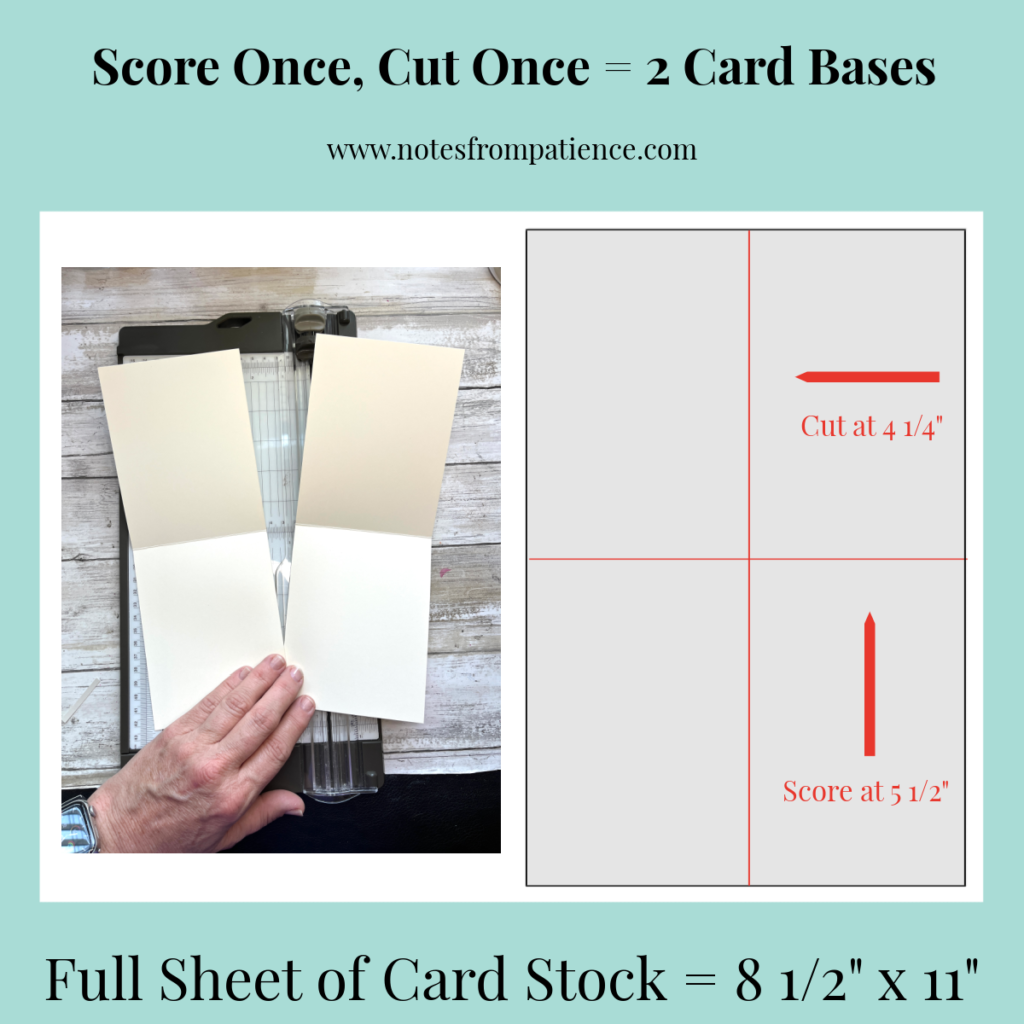
First things first – let’s make a card base
The first thing you need to learn how to cut card stock for cards is to make your card base. Simply take an 8 1/2″ x 11″ piece of card stock and cut it in half in either direction–now you have 2 card bases. Either direction you cut your card stock you will get the same size “card front” to create on; it’s only a matter of whether you want your card in ‘portrait mode’ or ‘landscape mode’.
The “card front” that you will have to create on is 5 1/2″ x 4 1/4″ when making a A-2 sized card from a half sheet of 8 1/2″ x 11″ card stock.

score once, cut once = 2 card bases
I am always looking for ways to make things easier and more efficient. Most often when I am making cards, I do at least 2 of the same at the same time. Scoring your card stock first, then cutting it, you easily have 2 card bases!
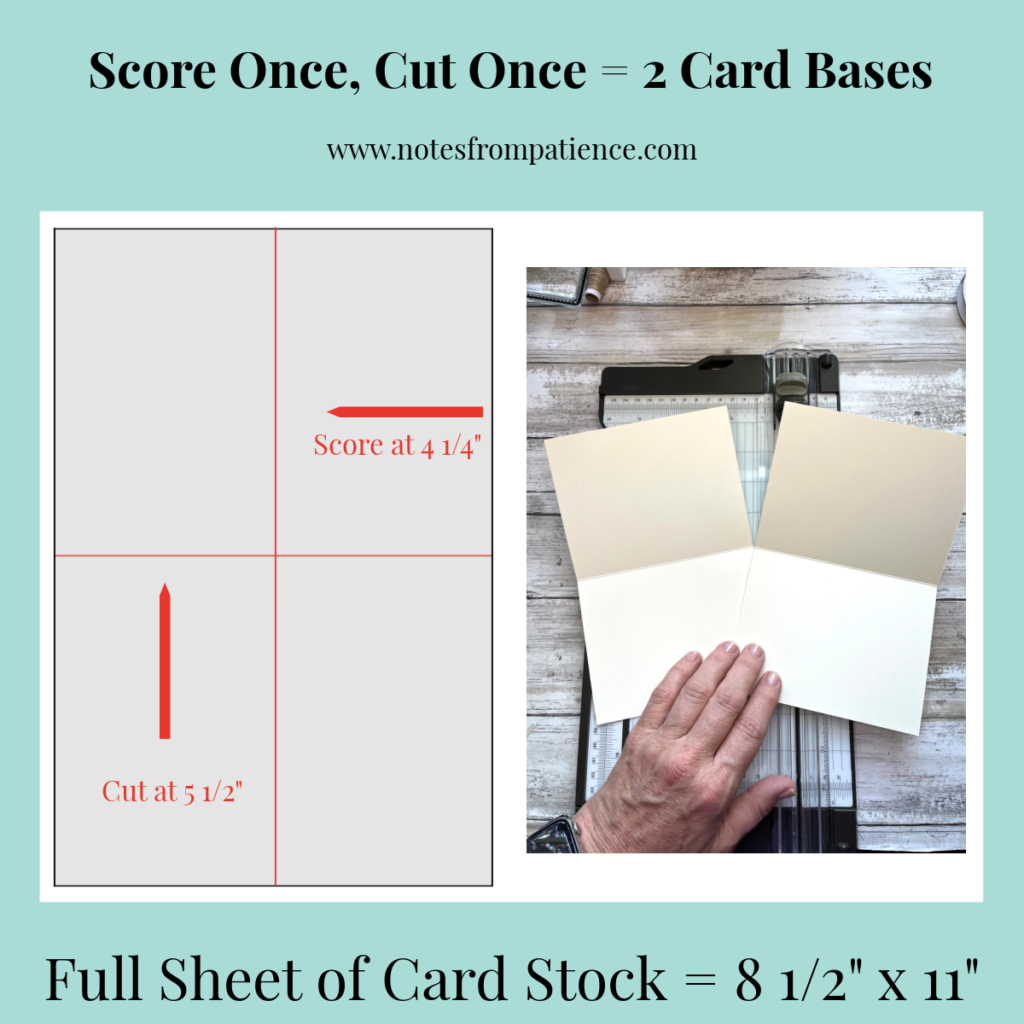
You can either score the LONG way and cut the SHORT, or vice versa. Both ways will give you the same size CARD FRONT when it’s folded in half – 5 1/2″ x 4 1/4″
how to cut layers for your cards
Now that we have cut the card base, how do you determine which size to cut your layers? Honestly, there is no right or wrong way. It boils down to personal preference and the design of your card. This is another important part of card making – you need to learn how to cut card stock for your card layers.
Most of the cards I make use the same basic measurements because I like the look of an equal border all the way around. This is not a “rule,” it’s just the look that I like and it makes it easy to decide what size to cut my layers.
To help with layering sizes, I created a set of templates with the basic sizes that I use often. In the video I show these templates, how I use them, and how to make your own to help you.

Card Layering Template Sizes
- 5 1/2″ x 4 1/4″ (card front size)
- 5 1/8″ x 4 1/8″
- 5 1/4″ x 4″
- 5 1/8″ x 3 7/8″
- 5″ x 3 3/4″
- 4 7/8″ x 3 5/8″
- 4 3/4″ x 3 1/2″
- 4 5/8″ x 3 3/8″
- 4 1/2″ x 3 1/4″
- 4 3/8″ x 3 1/8″
- 4 1/4″ x 3″
Don’t like cutting in eighths? No problem, just use the quarters. Remember, cut for the look that you like. I hope you found this “learn how to cut card stock for cards” guide and video tutorial helpful. Remember, there is no right sizes, but if you start with these basic size layers, you will be trying new things on your own in no time!
looking for more information
Join My email List https://bit.ly/3Uw39dx
Facebook Business Page https://bit.ly/3R1kb0g
Pinterest Page https://bit.ly/4bEsxEG
Paper Pumpkin https://bit.ly/4bGR9g4
Stampin’Up!.Net https://bit.ly/4iJ62RJ
Shop with Me https://bit.ly/3tEPlm1
Last Chance List https://bit.ly/4f0zjVi
On Line Exclusives https://bit.ly/43FyyNq
Scrapbooking https://bit.ly/3vty3JK
Events Calendar https://bit.ly/4cviMZy
YouTube https://bit.ly/3RX2tLz
Instagram https://bit.ly/3QkAwhh
***Make sure that you can see my name on the final checkout page listed as your Demonstrator when you order so that you know that you’re ordering with me!
Have a wonderful Stampin’ Day!

Leave a Reply